BLOGGER EKLENTİLERİ etiketine sahip kayıtlar gösteriliyor. Tüm kayıtları göster

3 Stil Popüler Yayınlar Eklentisi

Pazar, Kasım 08, 2015 2 Yorumlar icon18_edit_allbkg

Merhaba arkadaşlar bu yayınımda sizlere yine güzel bir blogger eklentisinden bahsedeceğim.Popüler yayınlarınızın daha havalı durmasını sağlayacak üç stil kendinize uygun olanı seçip kullanabilirsiniz.

İlk önce nasıl kurulacağından bahsedeyim her bir stil için css kodlarını]]><b:skin>veya </style>kodlarının üstüne ekliyoruz.

Stil1:


/* Popular Post Style 1 */
#PopularPosts1 ul{padding:10px 0;margin-top:-15px;}
.PopularPosts .item-thumbnail{margin:0}
.PopularPosts .widget-content ul{padding:0;margin-top:-7px}
.PopularPosts .item-title a{text-decoration:none;font-weight:400;font-size:14px;color:#000;line-height:1.4em;transition:all ease-in-out .1s;}
.PopularPosts .item-title{padding-bottom:.4em}
.PopularPosts .widget-content ul li:hover a,.PopularPosts .widget-content ul li a:hover{color:#48d;}
.PopularPosts li:first-child .item-snippet{position:absolute;top:0;opacity:0;visibility:hidden;width:85%;left:11px;color:#fff;background-color:rgba(172,22,172,.83);padding:10px;font-size:90%;line-height:normal;transition:.3s}
.PopularPosts li:hover:first-child .item-snippet{top:20%;opacity:1;visibility:visible}
.PopularPosts img{width:100%;height:100%}
.PopularPosts .widget-content ul li{list-style:none;margin:10px 0 0!important;padding:0 0 10px!important;line-height:1.3em!important;position:relative;border-bottom:1px solid #f1f1f1}
.PopularPosts li .item-snippet{display:none}
.PopularPosts li .item-thumbnail{width:85px;height:72px;margin:0 10px 0 0;overflow:hidden;float:left}
.PopularPosts li:first-child .item-thumbnail{width:100%;height:100%;max-height:190px;overflow:hidden;margin-bottom:10px}
.PopularPosts li:first-child .item-content{position:relative}
.PopularPosts li:first-child .item-thumbnail,.PopularPosts li:first-child .item-snippet{display:block}
.PopularPosts li:first-child .item-title a{font-size:18px;line-height:1.3em;font-weight:700}

Stil 2:


/* Popular Post Style 2 */
.PopularPosts .widget-content ul{padding:0;margin-top:-10px}
.PopularPosts .item-thumbnail{margin:0}
.PopularPosts .item-title {padding:0;}
.PopularPosts .item-title a{text-decoration:none;color:#000;}
.PopularPosts .item-title a:hover{color:#ff2d2d}
.PopularPosts .item-snippet{font-size:12px;line-height:1.6em;color:#777;padding-top:10px}
.PopularPosts li{border-bottom:1px dashed #e3e3e3}
.PopularPosts li .item-thumbnail,.PopularPosts li .item-snippet{display:none}
.PopularPosts li:first-child .item-thumbnail,.PopularPosts li:first-child .item-snippet{display:block;overflow:hidden;max-height:180px;margin-bottom:10px;}
.PopularPosts img{padding:0}
.PopularPosts .widget-content ul li{padding:10px 0;margin:0}

Stil 3:

/* Popular Post Style 3 */
#PopularPosts1 ul{padding:10px 0;margin-top:-15px;}
.PopularPosts .item-thumbnail{margin:0}
.PopularPosts .widget-content ul{padding:0;margin-top:-7px}
.PopularPosts .item-title a{text-decoration:none;font-weight:700;font-size:14px;color:#000;line-height:1.4em;transition:all ease-in-out .1s;}
.PopularPosts .item-title{padding-bottom:.4em}
.PopularPosts .widget-content ul li:hover a,.PopularPosts .widget-content ul li a:hover{color:#48d;}
.PopularPosts img{width:100%;height:100%}
.PopularPosts .widget-content ul li{list-style:none;margin:10px 0 0!important;padding:0 0 10px!important;line-height:1.3em!important;position:relative;border-bottom:1px solid #f1f1f1}
.PopularPosts li .item-snippet{position:absolute;top:0;opacity:0;visibility:hidden;width:85%;left:11px;color:#fff;background-color:rgba(172,22,172,.83);padding:10px;font-size:90%;line-height:normal;transition:.3s}
.PopularPosts li:hover .item-snippet{top:20%;opacity:1;visibility:visible}
.PopularPosts li .item-thumbnail{margin:10px 0;overflow:hidden;float:left}
.PopularPosts li:first-child .item-thumbnail{width:100%;height:100%;max-height:190px;overflow:hidden;margin-bottom:10px}
.PopularPosts li:first-child .item-content{position:relative}
.PopularPosts li:first-child .item-thumbnail,.PopularPosts li:first-child .item-snippet{display:block}

Şimdi stiller için javascript kodlarını ekliyoruz.Kodları </body> kodunun üstüne ekliyoruz.
Stil 1:

<script type='text/javascript'>
//<![CDATA[ 
function resizeThumbarlina(e,t){for(var s=document.getElementById(e),r=s.getElementsByTagName("img"),c=0;c<r.length;c++)r[c].src=r[c].src.replace(/\/s72\-c/,"/s"+t),r[c].width=t,r[c].height=t}resizeThumbarlina("PopularPosts1",400);
//]]>
</script>

Stil 2:
<script type='text/javascript'>
//<![CDATA[
// Popular Post
var newidth=295;var neweight=180;$(".popular-posts .item-thumbnail img").each(function(){var t=$(this).attr("width");$(this).attr("width",newidth),$(this).attr("height",neweight),$(this).attr("src",$(this).attr("src").replace("/s72-c/","/w"+newidth+"-h"+neweight+"-c/"))}),$(".PopularPosts .item-snippet").text(function(t,i){return i.substr(0,70)});
//]]>
</script>

Stil 3:

<script type='text/javascript'>
//<![CDATA[ 
function resizeThumbarlina(e,t){for(var s=document.getElementById(e),r=s.getElementsByTagName("img"),c=0;c<r.length;c++)r[c].src=r[c].src.replace(/\/s72\-c/,"/s"+t),r[c].width=t,r[c].height=t}resizeThumbarlina("PopularPosts1",400);
//]]>
</script>

Widget Ayarı:

Hepsi bu kadar 
Yardım için yoruma yazabilirsiniz..Sağlıcakla Kalın...

Blogger Site Haritası Oluşturma(Sitemap)

Perşembe, Ekim 29, 2015 Yorum Yapmak İstermisiniz? icon18_edit_allbkg
blogger-site-haritasi-olusturma


Selamlar herkese bu yayınımda sizlere blogger da sitemap oluşturmadan bahsedeceğim.Blog ziyaretçilerin daha kolay dolaşması için hazırlanmış hoş görünmlü güzel bi eklenti.

Nasıl kurulacağından bahsedeyim

Blogger Panel den > Sayfalar > Yeni Sayfa diyerek HTML kısmına aşağıdaki kodu yapıştıyoruz.

<style scoped="" type="text/css">
#head-tab{background:#51a8e9;padding:15px 20px;margin:0;color:#fff;font-size:16px;text-align:center;font-weight:700;letter-spacing:.5px;}
#tabbed-toc{margin:0 auto;background-color:#222;overflow:hidden;position:relative;color:#fff;border-left:5px solid #51a8e9}
#tabbed-toc ul,#tabbed-toc ol,#tabbed-toc li{margin:0;padding:0;list-style:none}
#tabbed-toc .toc-tabs{width:30%;float:left}
#tabbed-toc .toc-tabs li a{display:block;font-size:14px;overflow:hidden;text-overflow:ellipsis;color:#fafafa;text-decoration:none;padding:8px 12px;cursor:pointer}
#tabbed-toc .toc-tabs li a:hover{background-color:#333;color:#fff}
#tabbed-toc .toc-tabs li a.active-tab{background-color:#333;color:#fff;position:relative;z-index:5;}
#tabbed-toc .toc-content,#tabbed-toc .divider-layer{width:70%;float:right;background-color:#fafafa;border:1px solid #fafafa}
#tabbed-toc .divider-layer{float:none;display:block;position:absolute;top:0;right:0;bottom:0}
#tabbed-toc .panel{position:relative;z-index:5;font:normal normal 10px/normal Helmet,Freesans,Sans-Serif}
#tabbed-toc .panel li a{display:block;position:relative;font-weight:bold;font-size:14px;color:#7f8c8d;line-height:20px;height:30px;padding:6px 12px;text-decoration:none;outline:0;overflow:hidden}
#tabbed-toc .panel li time{display:block;font-style:italic;font-weight:normal;font-size:10px;color:#666;float:right}
#tabbed-toc .panel li .summary{display:block;padding:10px 12px 10px;font-style:italic;border-bottom:1px solid #2c3e50;overflow:hidden}
#tabbed-toc .panel li:nth-child(even){background-color:#fafafa}
#tabbed-toc .panel li a:hover,#tabbed-toc .panel li a:focus,#tabbed-toc .panel li a:hover time,#tabbed-toc .panel li.bold a{background-color:#fafafa;color:#e06666;outline:0}
#tabbed-toc .panel li.bold a:hover,#tabbed-toc .panel li.bold a:hover time{background-color:#36424a}
.post ol li:before{display:none}
@media(max-width:700px){
#tabbed-toc{border:1px solid #ccc}
#tabbed-toc .toc-tabs,#tabbed-toc .toc-content{overflow:hidden;width:auto;float:none;display:block}
#tabbed-toc .toc-tabs li{display:inline;float:left}
#tabbed-toc .toc-tabs li a,#tabbed-toc .toc-tabs li a.active-tab{background-color:#777}
#tabbed-toc .toc-tabs li a.active-tab{background-color:#51a8e9;color:#fafafa}
#tabbed-toc .toc-content{border:0}#tabbed-toc .panel li a{font-size:12px;line-height:20px;height:20px;padding:0 12px}
#tabbed-toc .divider-layer,#tabbed-toc .panel li time{display:none}}
</style>

<div id="head-tab">
Site Haritası</div>
<div id="tabbed-toc">
</div>
<script>
var tabbedTOC = {
    blogUrl: "blog adresiniz", // Blog URL
    containerId: "tabbed-toc", // Container ID
    activeTab: 1, // The default active tab index (default: the first tab)
    showDates: false, // `true` to show the post date
    showSummaries: false, // `true` to show the posts summaries
    numChars: 200, // Number of summary chars
    newTabLink: true, // Open link in new window?
    maxResults: 99999, // Maximum post results
    preload: 0, // Load the feed after 0 seconds (option => time in milliseconds || "onload")
    sortAlphabetically: true, // `false` to sort posts by published date
    showNew: 7, // `false` to hide the "Yeni!" mark in most recent posts, or define how many recent posts are to be marked
    newText: " <em style='color:#F2784B;'>Yeni</em>" // HTML for the "Yeni!" text
};
</script>
<script async="async" src="https://cdn.rawgit.com/Indzign/theme/master/daftar-isi-indzign.js"></script>

Yukarıda blog adresiniz yazan yere kendi adresinizi yazın.
Mavi renk yerine kendi istediğiniz renk ile değiştirmek için kodlardan 51a8e9kodunu aratın ve yerine kendi renk kodunuzu girin.


Yardım için yoruma yazabilirsiniz...Sağlıcakla Kalın...


Blogger Otomatik Slider Manşet Eklentisi

Salı, Ekim 27, 2015 22 Yorumlar icon18_edit_allbkg
blogger-otomatik-slider-eklentisi

Merhaba arkadaşlar,
bu yayınımda sizlere güzel bi otomatik slider  manşet eklentisinden bahsedicem.

Kurulumu:
Blogger Yerleşimden Gadget Ekle > Html /JavaScript diyoruz ve aşağıdaki kodu yapıştırıyoruz.Daha sonra blog adresiniz yazan yere kendi blog adresinizi yazıyorsunuz bu kadar.

<style>
/* CSS Slider Recent Post */
#slides *{-moz-box-sizing:border-box;-webkit-box-sizing:border-box;box-sizing:border-box}
#slides ul,#slides li{padding:0;margin:0;list-style:none;position:relative}
#slides ul{height:320px}
#slides li{width:50%;height:100%;position:absolute;display:none}
#slides li:nth-child(1), #slides li:nth-child(2), #slides li:nth-child(3), #slides li:nth-child(4), #slides li:nth-child(5){display:block}
#slides li:nth-child(1){left:0;top:0}
#slides li:nth-child(2){left:50%;width:25%;height:50%}
#slides li:nth-child(3){left:75%;width:25%;height:50%}
#slides li:nth-child(4){left:50%;top:50%;width:25%;height:50%}
#slides li:nth-child(5){left:75%;top:50%;width:25%;height:50%}
#slides li:nth-child(1) h4 {overflow:hidden;font-size:25px;bottom:0;color:#fafafa;width:100%;
padding:10px 10px 10px 90px;text-align:left;text-transform:uppercase;background:rgba(0,0,0,0.3);
height:90px;font-family:'Oswald';text-shadow:2px 2px 0 rgba(0,0,0,0.2);line-height:32px;left:0;}
#slides li:nth-child(1) .label_text {font-size:30px;display:block;bottom:10px;left:10px;
padding:0;font-family:'Oswald';box-shadow:5px 3px 0 rgba(0,0,0,0.2);}
#slides li:nth-child(1) span.dd {display:block;font-size:30px;padding:12px 15px;
background:#ff6553;margin:0;}
#slides li:nth-child(1) span.dm {display:block;font-size:14px;background:#333;color:#fff;
padding:5px 21px;text-transform:uppercase;margin:0;}
#slides li:nth-child(1) span.dy, #slides li:nth-child(1) span.autname{display:none;}
#slides a{display:block;width:100%;height:100%;overflow:hidden}
#slides img{display:block;width:100%;height:auto;border:0;padding:0;background-color:#333;-moz-transform:scale(1.0) rotate(0);-webkit-transform:scale(1.0) rotate(0);-ms-transform:scale(1.0) rotate(0);transform:scale(1.0) rotate(0);transition:all 0.6s linear;}
#slides li a:hover img {-moz-transform:scale(1.1) rotate(1deg);-webkit-transform:scale(1.1) rotate(1deg);-ms-transform:scale(1.1) rotate(1deg);transform:scale(1.1) rotate(1deg);transition:all 0.3s linear;}
#slides .overlayx{width:100%;height:100%;position:absolute;z-index:2;background-image:url(http://2.bp.blogspot.com/-0haO2Mfkjjk/VDgZww2tfEI/AAAAAAAAHAk/zhu3INYSkHA/s1600/fade.png);background-position:50% 40%;background-repeat:repeat-x;}
#slides h4{position:absolute;bottom:40px;margin:0;font-size:13px;font-family:'Oswald';
left:10px;padding:5px 10px;color:#f9f9f9;z-index:3;line-height:20px;font-weight:normal;
background:rgba(41,41,41,0.7);text-align:left;text-transform:uppercase;margin-right:10px;}
#slides .label_text{font-size:12px;color:#fff;bottom:10px;z-index:3;left:10px;
position:absolute;background:rgba(255,101,83,0.8);padding:3px 6px;font-family:'Oswald';
text-transform:uppercase;}
#slides li:nth-child(2) .autname,#slides li:nth-child(3) .autname,#slides li:nth-child(4) .autname,#slides li:nth-child(5) .autname{display:none;}
#slides .overlayx,#slides li{transition:all .4s ease-in-out}
#slides li:nth-child(1) .overlayx{display:none;}
#slides li:hover .overlayx{opacity:0.1}

@media only screen and (max-width:800px){
#slides li:nth-child(1) h4 {font-size:18px;line-height:24px;}}

@media only screen and (max-width:600px){
  #slides ul{height:600px}
  #slides li:nth-child(1){width:100%;height:50%}
  #slides li:nth-child(2){top:50%;height:25%;left:0;width:50%}
  #slides li:nth-child(3){left:50%;top:50%;width:50%;height:25%}
  #slides li:nth-child(4){left:0;top:75%;height:25%;width:100%}
  #slides li:nth-child(5){display:none;}}

@media only screen and (max-width:480px){
#slides li:nth-child(1) h4 {font-size:13px;line-height:16px;}}
</style>
<div id="featuredpost"></div>
<script type="text/javascript" src="https://arlina-design.googlecode.com/svn/slider-post.js"></script>
<script type='text/javascript'>
//<![CDATA[
$(document).ready(function () {
FeaturedPost({
blogURL:"blog adresiniz",
MaxPost:8,
idcontaint:"#featuredpost",
ImageSize:500,
interval:10000,
autoplay:true,
tagName:false
});
});
//]]>
</script>


Yardım için yoruma yazabilirsiniz...Sağlıcakla Kalın...

Blogger Kod Penceresi Oluşturma

Pazartesi, Ekim 19, 2015 Yorum Yapmak İstermisiniz? icon18_edit_allbkg
blogger-kod-penceresi-olusturma

Merhaba arkadaşlar,bu yayınımda sizlere bloğunuzda kullanabileceğiniz kod pencerelerini sunacağım.
Eğer bloğunuzda yayınlarda html,css,javascript gibi kodlar paylaşıyorsanız ve bunları pencere içine almak istiyorsanız aşağıdaki adımları uygulayın.

Adım 1:Aşağıdaki css kodunu ]]><b:skin> veya </style> kodunun üstüne ekliyoruz.


/* CSS Simple Pre Code */
pre {
    background: #333;
    white-space: pre;
    word-wrap: break-word;
    overflow: auto;
}

pre.code {
    margin: 20px 25px;
    border-radius: 4px;
    border: 1px solid #292929;
    position: relative;
}

pre.code label {
    font-family: sans-serif;
    font-weight: bold;
    font-size: 13px;
    color: #ddd;
    position: absolute;
    left: 1px;
    top: 15px;
    text-align: center;
    width: 60px;
    -webkit-user-select: none;
    -moz-user-select: none;
    -ms-user-select: none;
    pointer-events: none;
}

pre.code code {
    font-family: "Inconsolata","Monaco","Consolas","Andale Mono","Bitstream Vera Sans Mono","Courier New",Courier,monospace;
    display: block;
    margin: 0 0 0 60px;
    padding: 15px 16px 14px;
    border-left: 1px solid #555;
    overflow-x: auto;
    font-size: 13px;
    line-height: 19px;
    color: #ddd;
}

pre::after {
    
    padding: 0;
    width: auto;
    height: auto;
    position: absolute;
    right: 18px;
    top: 14px;
    font-size: 12px;
    color: #ddd;
    line-height: 20px;
    overflow: hidden;
    -webkit-backface-visibility: hidden;
    transition: all 0.3s ease;
}

pre:hover::after {
    opacity: 0;
    visibility: visible;
}

pre.code-css code {
    color: #91a7ff;
}

pre.code-html code {
    color: #aed581;
}

pre.code-javascript code {
    color: #ffa726;
}

pre.code-jquery code {
    color: #4dd0e1;
}

Adım 2:Aşağıdaki JavaScript kodunu</body> kodunun hemen üstüne ekleyin.

<script type="text/javascript">
//<![CDATA[
//Pre Auto Selection
$('i[rel="pre"]').replaceWith(function() {
    return $('<pre><code>' + $(this).html() + '</code></pre>
');
});
var pres = document.querySelectorAll('pre,kbd,blockquote');
for (var i = 0; i < pres.length; i++) {
  pres[i].addEventListener("dblclick", function () {
    var selection = getSelection();
    var range = document.createRange();
    range.selectNodeContents(this);
    selection.removeAllRanges();
    selection.addRange(range);
  }, false);
}
//]]>
</script>

Adım 3:Şimdi ise kullanım şeklini göstereyim hangi şekilde kullanmak istiyorsak aşağıdaki koddan seçiyoruz.
<pre class='code code-html'><label>HTML</label><code>...Html kod için</code></pre>

<pre class='code code-css'><label>CSS</label><code>... Css kod için ...</code></pre>

<pre class='code code-javascript'><label>JS</label><code>... JavaScript kod için ...</code></pre>

<pre class='code code-jquery'><label>Jquery</label><code>... jQuery kod için  ...</code></pre>
Sağlıcakla kalın...
 Kaynak:http://goo.gl/XVZPjs

Blogger İletişim Formu Oluşturma(Google Form ile)

Çarşamba, Eylül 30, 2015 7 Yorumlar icon18_edit_allbkg
blogger-iletisim-sayfasi

Merhaba arkadaşlar,
bu yayınımda sizlere blogger kullanırken çok güzel ve pratik bi eklenti diyebileceğimiz Google'dan faydalanarak bloggerımıza iletişim sayfası oluşturabileceğiz.Blogger kullanan kullanıcıların en çok ihtiyaç duyduğu sayfa olan iletişim sayfasını oluştuma için aşağıdaki adımları uyguluyoruz.

RESİMLİ ANLATIM

Adım 1:
İlk önce https://www.google.com/intl/tr_tr/forms/about/ adresine giriyoruz ve Google Formlar'a git diyoruz.


google-form-olu%25C5%259Fturma-1

Adım 2:
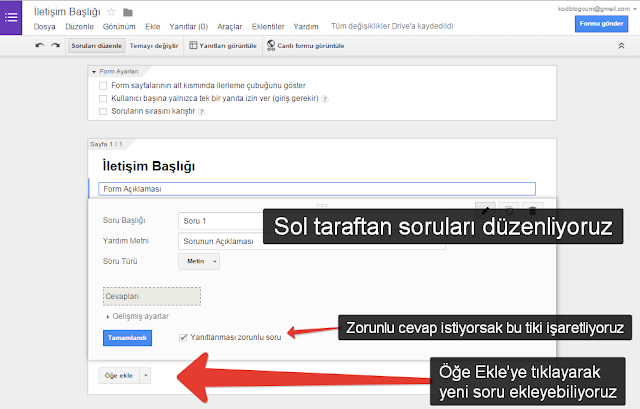
Tıkladığımız ekranda aşağıdaki yer açılacaktır.Resimdeki gibi formu oluşturuyoruz.
google-form-olusturma-2

Adım 3: 
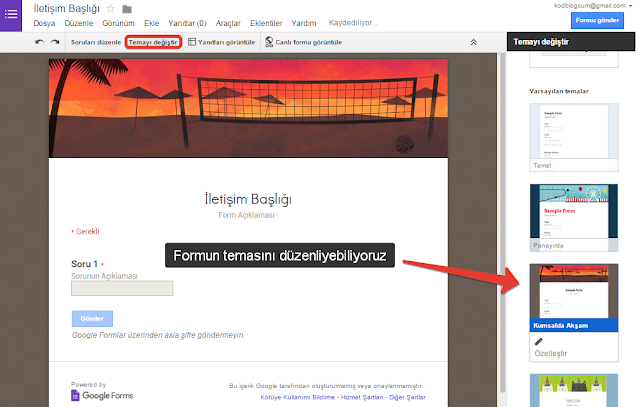
Formu oluşturduktan sonra tasarım kısmına geliyoruz "Temayı Değiştir" alanına geliyoruz.
google-form-olusturma-3

Adım 4:
Özelleştir kısmından yazıların rengini,üst resmi,arkaplan vs. yerlerini düzenliyoruz.
google-form-olusturma-3

Adım 5:
Daha sonra Yanıtları Görüntüle diyoruz ve ordan Araçlar sekmesinden "Bildirim Kuralları"ndan mesaj geldiğinde e-posta adresinize hemen mi yoksa 24 saat içerisinde mi bildirimini ayarlıyoruz.
google-form-olustuma-7

Adım 6:
Daha sonra Form sekmesine gelip Formu Web Sayfasına Yerleştir diyoruz ve aşağıdaki resimlerdeki adımları uyguluyoruz.
google-form-olustuma-5

Adım 7:
Tıkladıktan sonra aşağıdaki gibi bi ekran açılacaktır.Aşağıdaki ekrandaki yerde formun geniş ve yüksekliğini ayarlıyoruz ve kodu kopyalıyoruz.
google-form-olustuma-6

Adım 8:
Şimdi Blogger Admin Panel'ine gelip Sayfalardan Yeni Sayfa diyoruz ve kodu html kısma yapıştırıyoruz ve kaydediyoruz.
google-form-olustuma-8
google-form-olustuma-10

Adım 10:
Daha blogdan iletişim sayfasına bakıyoruz herşey tamamdır...
google-form-olustuma-9*

Evet arkadaşlar Google'dan faydalanarak istediğimiz tarzda iletişim formunu oluşturuyoruz.
Yardım için yoruma yazabilirsiniz...Sağlıcakla Kalın...


Blogger Hazır Sosyal Paylaşım Eklentisi - 12

Çarşamba, Temmuz 29, 2015 4 Yorumlar icon18_edit_allbkg

Merhaba arkadaşlar,
bu yayınımda sizlere yeni bir blogger sosyal paylaşım eklentisinden bahseceğim.Kullanışlı zarif oluşu bloğunuza güzel bir hava oluşturacaktır.Üzerine geldiğimizde rengi değişen bu eklentiyi anlatayım.

Nasıl Eklenir?

-Blogger Admin Panel > Yerleşim > Gadget Ekle > Html/JavaScript diyoruz ve aşağıdaki kodu yapıştırıyoruz.


<style>#sosmed{margin:16px auto 5px;}
#sosmed li:hover{background-color:#414b5e;}
#sosmed li{line-height:30px;font-weight:400;margin:auto;margin-bottom:3px;border-radius:5px;-webkit-transition:all .2s ease-in-out;transition:all .2s ease-in-out;}
#sosmed li a{padding:5px 5px 3px 14px;display:block;color:#fff;}
#sosmed li i{border-right:1px solid rgba(0,0,0,.2);padding-right:5px;margin-right:5px;width:15px;}
.bg-fb{background:#5772bb;}
.bg-tw{background:#3494e5;}
.bg-gp{background:#e34242;}</style>
<div>
<nav id="sosmed">
<ul>
<li class="bg-fb"><a href="#"><i class="fa fa-facebook"></i> Facebook'ta Takip Et</a></li>
<li class="bg-tw"><a href="#"><i class="fa fa-twitter"></i> Twitter'da Takip Et</a></li>
<li class="bg-gp"><a href="#"><i class="fa fa-google-plus"></i> Google+'da Takip Et</a></li>
</ul>
</nav></div>

# ile olan yerlere sosyal medya adreslerimizi yazıyoruz.


Yardım için yoruma yazabilirsiniz...Sağlıcakla Kalın...